Building the Boys’ New Toy
By: Mr. Wilson on
April 13, 2011
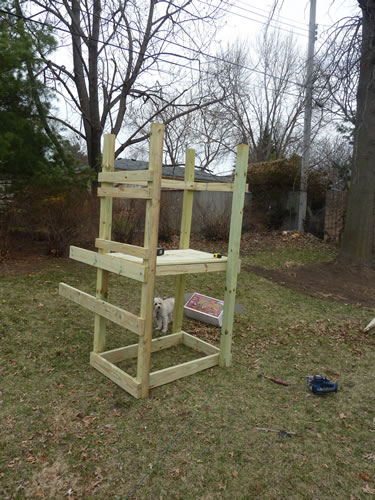
 Next up is the frame of the tower. Now things get more difficult. You'll quickly find out if your 4x4s are warped or if you're bad at making measurements. Measure thrice, screw once.
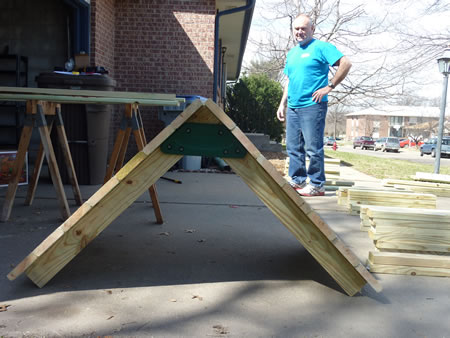
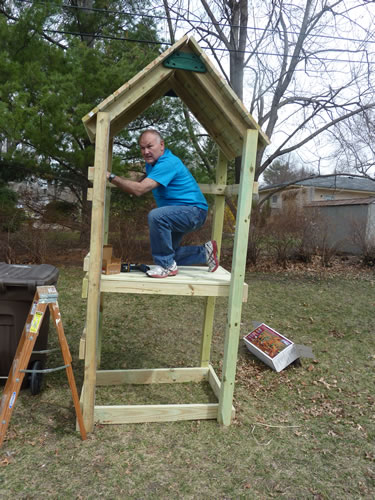
 Then you put the roof on top of the tower. This part is tricky. I think the instruction booklet says to do this with the tower on its side. My dad and I didn't like that idea. For one thing, lifting the assembled contraption and resetting its location would not be very easy. Instead, we decided to lift the roof onto the tower as it stood. Ultimately I think we made the right decision. Getting the roof up there was extremely awkward, but we moved slowly and got it into place. Had we had a third person available the process would have been quite simple.
 Unfortunately at this stage two things happened: I didn't take many photos, and the photos I did take feature our foster kids. I'm not free to post photos of our foster boys (for now), so you'll have to use your imagination based on this photo of the finished playset.
 Next up is the rock wall. I ended up building most of this on my own, with a little help from my boys to hold pieces in place. It was an easier process than I expected. Once my dad returned we put the cross beams in place, connecting the wall to the tower. Again, this part was pretty straightforward. Having a third person to help hold the beams would have been handy. Nevertheless, my dad and I got it done just fine.
Last came the A-frame and swing bar. This process wasn't all that difficult, but portions of it were very awkward. And I mean really awkward. If you don't have a third person for anything else, recruit one for this part. See, at one point you've got the A-frame, swing beam, and a third 4x4 all connected, and somehow you're supposed to manipulate the contraption without twisting any of the brackets. Good luck. Again, my dad and I got it done.
Now here's where the miracle happened. We moved the swing component over to the tower to prepare for the attachment process. Somehow -- and I'm still not sure how -- everything lined up perfectly. It was fantastic. Remember all that careful measuring and alignment we did back on the tower? It paid off here. A few screws, a couple bolts, and bam, we had ourselves a swingset.
Last up were the finishing touches. We added the swings, monkey rings, slide, and climbing wall. We also dumped in the sand -- 3 cubic feet worth. Notably, we didn't add the rocks for the rock wall. As we watched our boys test it out, we decided we liked how difficult (and fun) it was for them without the rocks. We can always add them later if we change our minds, but for now they're sitting in a box in the garage.
Next up is the rock wall. I ended up building most of this on my own, with a little help from my boys to hold pieces in place. It was an easier process than I expected. Once my dad returned we put the cross beams in place, connecting the wall to the tower. Again, this part was pretty straightforward. Having a third person to help hold the beams would have been handy. Nevertheless, my dad and I got it done just fine.
Last came the A-frame and swing bar. This process wasn't all that difficult, but portions of it were very awkward. And I mean really awkward. If you don't have a third person for anything else, recruit one for this part. See, at one point you've got the A-frame, swing beam, and a third 4x4 all connected, and somehow you're supposed to manipulate the contraption without twisting any of the brackets. Good luck. Again, my dad and I got it done.
Now here's where the miracle happened. We moved the swing component over to the tower to prepare for the attachment process. Somehow -- and I'm still not sure how -- everything lined up perfectly. It was fantastic. Remember all that careful measuring and alignment we did back on the tower? It paid off here. A few screws, a couple bolts, and bam, we had ourselves a swingset.
Last up were the finishing touches. We added the swings, monkey rings, slide, and climbing wall. We also dumped in the sand -- 3 cubic feet worth. Notably, we didn't add the rocks for the rock wall. As we watched our boys test it out, we decided we liked how difficult (and fun) it was for them without the rocks. We can always add them later if we change our minds, but for now they're sitting in a box in the garage.
 It's hard to say how many hours we actually worked on the playset. It was more than the 7-9 that the instructions indicated. We used portions of two weekends and a couple evenings. The process wasn't extremely difficult by any means, but you probably don't want to plan on finishing in, say, a single Saturday. It could happen (especially if you have enough tools so that more than one person can be active at all times), but I wouldn't plan on it unless you really know what you're doing. We didn't.
Since we added an extra swing, I went ahead and purchased the "commercial grade" swing and brackets. That allows big folks like me a chance to swing without having to worry about breaking anything when I don't act my age.
It's hard to say how many hours we actually worked on the playset. It was more than the 7-9 that the instructions indicated. We used portions of two weekends and a couple evenings. The process wasn't extremely difficult by any means, but you probably don't want to plan on finishing in, say, a single Saturday. It could happen (especially if you have enough tools so that more than one person can be active at all times), but I wouldn't plan on it unless you really know what you're doing. We didn't.
Since we added an extra swing, I went ahead and purchased the "commercial grade" swing and brackets. That allows big folks like me a chance to swing without having to worry about breaking anything when I don't act my age.
 The slide has been a hit:
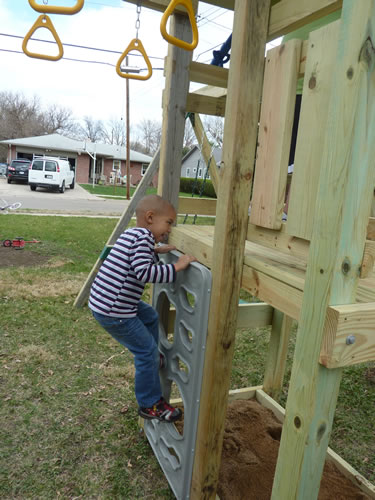
 ...as has the climbing wall. The one disadvantage to the Bronze configuration is that this climbing wall is the only way to get up to the playdeck. For us that's not a problem, but if you have little peewees or less mobile types, you may want to think about other options.
 The playset has been up for a few days now and already it's the hit of the neighborhood. It has proved sturdy even with five people on it at once. I'm anxious to see how well it ages. The reviews I've read all suggest that it'll age just fine, assuming we take care of basic maintenance tasks. It seems to have been a good investment, and a well-timed one since there are plenty of good outside playing days ahead of us.
Comments
See what your friends and neighbors have to say about this.
We bought a similar (but much smaller) kit a 4 years ago. It just contained the swings & monkey bars. Or experiences were similar - very awkward at times, and had to read between the lines and “guess” a number of times. I like that you called it “use common sense”. I’ll go with that.
So here is your visit from the ghost of Christmas Future… just last night my family was gathered around it as the kids were swinging and we were discussing how we wish that we had painted, or stained, or otherwise weatherproofed the wood in some way. At the time the advice given to us was “it’s pressure treated lumber, don’t worry about it.” Now that 4 years worth of water has gotten in around all of the bolts, It is split up pretty badly, to the point of not being so sure about the structural integrity in a few places. I’m not sure that painting would stop it entirely, but it would probably help a lot, and it would look more “finished”. (Your boys might even enjoy helping.)
A couple days ago I stood out in the yard and looked at the playset and thought to myself, “I wonder what it would look like if we painted it?”. It could look really awesome, if done right. Unfortunately I have all the artistic ability of a walnut.
I’ll definitely keep your experience in mind.
It doesn’t need painting with color. You could treat it like a deck with Thompson’s Water Seal or equivalent.
That’s my default option at this point.
Measure twice…..
as opposed to “measure once, screwed thrice?”
Looks great! My dad and I built something like this, years ago, for my younger siblings, but he drew it out himself (sort of) and we built it from that. I learned a whole new vocabulary in JH school from him, a former Marine. Good times. Thanks for the write up.
Share your thoughts with the community.
Commenting is no longer permitted on this post.